The Self-Paced Classroom
History
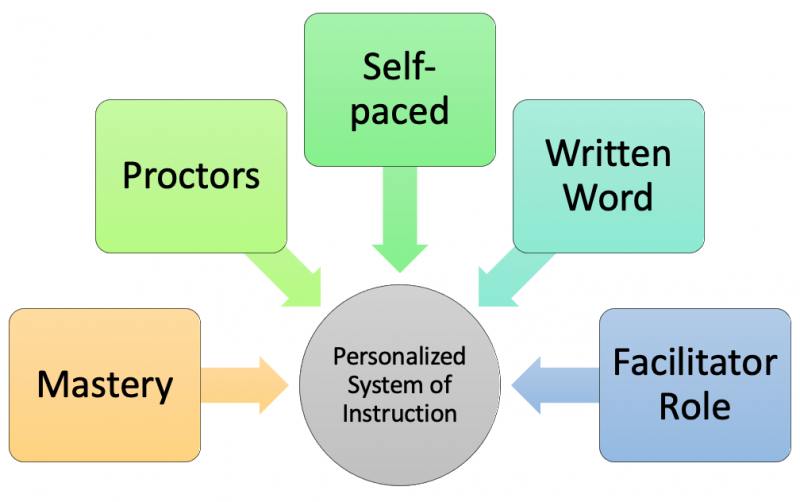
In the 1960’s, Fred Keller introduced his concept of personalized learning, Keller’s Personalized System of Instruction (PSI). The five qualities of PSI are:
- The mastery of course material
- The use of proctors (mentors, peer reviewers, or tutors (Keller used prior students or students who master content previously)
- Learner self-pacing
- The written word is strongly stressed
- Lectures and demonstrations are primarily for motivational purposes (role of facilitator not “teacher”); Knowing the importance of learners felling connected as contributing to success, the facilitator role should include strong presence; do not “set and forget your course” or you will lose earner’s in a self-paced course
Definition
A learner-centered self-learning approach provides students with a course design and the tools and resources they need in order to learn at their own pace and make choices about the best sequence (focus) of their learning. Typically, learners meet the same milestone timelines. For example, a mid-week discussion, a quiz, and an end-of week test. But the amount they actually absorb is different. Not all, sometime not most, achieve mastery. Self-paced learning facilitates learner’s mastering content before proceeding. The time to achieving similar master is different per student.
There are major shifts in self-paced learning:
- Learner decides pace to proceed through course, not the instructor
- Instructor still decides most if not all learning outcomes and learning pathway(s). However, each learner need not touch each topic if an outcome has already been mastered (as indicated by the pre-assessment)
- Learner is responsible for own learning (staying on task/time management, reaching out for assistance as needed)
- Prepared materials are available to the learners versus the instructor presenting a regular intervals.
- Unlike the traditional class design, self-paced learning requires that the learner achieve a defined mastery level before proceeding to the next lesson; this minimizes the knowledge gaps; a learner who passes a traditional course may not achieve mastery in one or more content areas, yet pass the course
Benefits of Self-Paced Learning
Self-paced learning is not less work. It may not be easier than traditional classroom learning. However, there are some benefits to self-paced learning:
- Because learners may pace their learning based upon mastery acquisition, self-paced learning, like asynchronous learning may have an equalization effect.
- Developing self-regulation and self-efficacy (personal responsibility and confidence in one’s abilities) can have a lifelong impact.
- Learners who already have mastered content do not have to wait on those struggling before proceeding.
- Disadvantages of Self-Paced Learning
- Learners ill-prepared for self-paced learning may struggle or quit without personalized attention. They also may need to develop time-management and organization skills.
- There needs to be a balance of consistency and choice in the design. Learner’s will fall into the rhythm or routine of a class that is well-structured and consistent in design. However, the content within the structure does not change or permit choice, they may get bored or disengage.
Design Challenges (List/suggest)
- Learners often don’t know how to pace their own learning and don’t have the skills and stamina to keep to a good pace on their own
- Instructors often don’t have experience organizing their classroom, resources, or time around highly individualized interactions with learners
- There aren’t enough high-quality student-facing Learning Assets available to students and teachers
- Programming and grouping students become incredibly challenging: how does one encourage collaboration, academic discussion, and student interactions in a self-paced program?
- Students with different learning styles may not adapt as easily unless you differentiate activities and assessments (content)
- Students feel low/no ownership of the overall direction of the class
Tips for a Short Implementation Time-Line
In a short-timeline, schools often begin by instituting flexible pacing (see definition) at the classroom level. Over time, the course can evolve to be fully self-paced. Consider a pre-course readiness assessment for online learning (if applicable) and self-learner characteristics.
Self-Paced Process and Considerations
Step 1: Select a Module (Lesson, Chapter, Unit, Topic, Week) of Content
This can be a chapter in a textbook, articles, video, presentation or a batch of skills or content you would typically teach as a unit over a couple of weeks. This unit should have clearly defined learning outcomes. Organized the module into small, discrete steps, each one treating a single concept or segment of content. This is known as microlearning. Advantages of microlearning is that you may more accurately tie mastery to outcomes, learners have frequent sense of accomplishment, and frequents success can build learner confidence (self-efficacy).
Step 2: Create the Assessment
Mastery using mini-checks to move to next section. At least one question per topic concept. Decide what students should be able to do by the end of the unit and create an assessment that measures it. The simplest type is a test with clearly identified right and wrong answers, where each item (or small group of items) in this assessment is aligned with one learning outcome. For skills that require more teacher interpretation to measure, like writing, the assessment could be a writing task, such as an extended response question with a prompt and a rubric. Each skill listed in the rubric would align with a specific learning outcome. Assessments should provide immediate feedback (no barriers to progression), with a diagnosis (not grade, but to identify skills and content knowledge gaps), remediation if needed, repeat assessment (as many times as needed to achieve mastery) and access to next steps path. Provide multiple opportunities in multiple formats to assess mastery.
Step 3: Create a Module Guide
Set up a guide that shows which assessment question aligns with each learning outcome, then lists book or video lessons students can follow to learn each skill, exercises that will give students independent practice with the skill, and a brief assessment students can take to test their mastery. Practice quizzes show answers to students (auto-graded). Tests/exams do not show answers to students but they will receive instructor feedback about what was missed as a concept and where to strengthen that skill/knowledge. Faculty will maintain bi-weekly report and stats ongoing as appropriate. Do allow multiple, but not unlimited attempts. Permit 5 attempts for example, before tutoring is required and the practice activity is reset. This will minimize learners repeating an activity without fully engaging their brains. It should motivate them to tray and reach mastery more quickly. Otherwise, they may continue trying and fall so far behind they cannot complete the course.
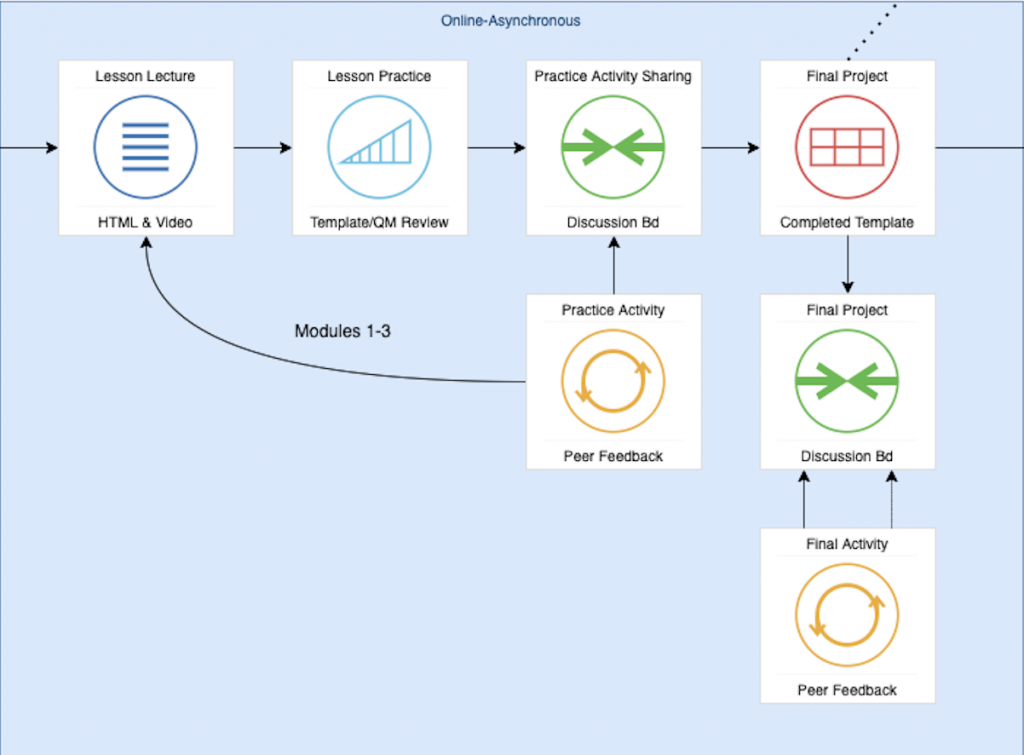
Example Module Guide (Matrix) with Suggested Due Dates
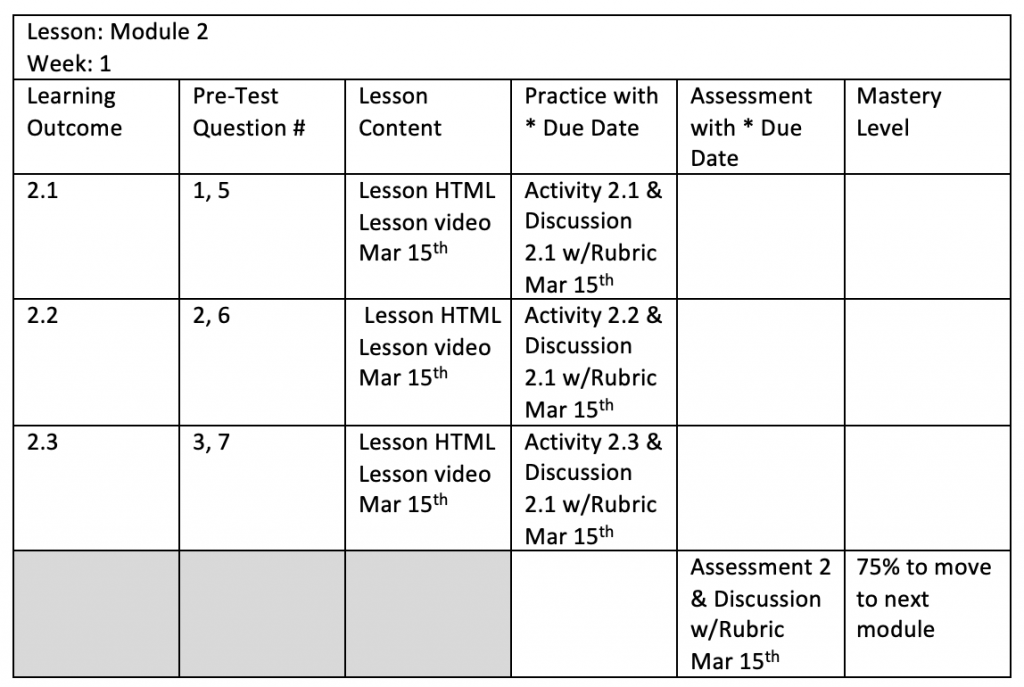
Below is an example of a workshop flow with 3 similar structured lessons and a final project. The map or blueprint uses the LEML (Learning Environment Modeling Language). The Institute for Learning Environment Design at the University of Central Oklahoma offers resources and training in Learning Experience Design (LxD).
Step 4: Create the Learning Activities
Learning activities are carefully selected or designed to address the specific learning objectives. Include activities that permit sharing, explaining or reflection.
Step 5: Give the Pre-Test
Use the assessment you created in Step 2 to pre-test students on the skills for this unit. Use the results to identify which learning targets each student has already mastered, and which ones they still need to learn.
Step 6: Help Students Identify Outcomes to Master
Give students a way to track their own progress. Giving each student a module guide that includes suggested due dates, have them mark which outcomes they have already mastered—based on pre-test results—and which ones they still need to learn. They need a pacing guide to assess whether they’re on track or need extra time in tutoring. It also allows them to monitor their pace: If they find that they’ve mastered only two topics by the time recommended that they should have mastered five, they know they need to come to tutoring.
Step 7: Provide Time, Materials, and Supervision for Self-Paced Learning
From this point on, students will begin the process of moving through the lessons on their own. Your job is to make sure they have the materials they need to do the work. Make sure students know where to look for answer keys, and where they can access the mini-assessment when they are ready to take it. Clearly state on the assignments, whether there is a re-take or re-submit options and how many times. Provide links to how-to within the activities. For example, how to submit an assignment. Check in with students regularly to make sure they are making good use of their time. The learner’s mastery of each step is required and checked before the learner may proceed to the next step.
Step 8: Iteratively revise to improve the course
Keep in mind that this system probably won’t work perfectly the first time you try it. You might elect to implement self-paced learning module by module. You can use each module to inform improvement for the successive module.
Developing an Assessment
- Choose one of the skills that you identified in the pre-module activity for this lesson. https://community.canvaslms.com/t5/Canvas-Basics-Guide/What-are-Outcomes/ta-p/75
- Write a specific and observable behavior statement for the skill.
- Use that behavior statement to write a description of the deliverable product that a student would be able to produce if he or she could successfully perform the behavior that you describe. In other words, what does mastery of the skill look like?
- Write a short qualitative rubric for that assignment, using whatever grading scale you feel is appropriate. For each level of competency, write a short narrative description of what that level of quality looks like. https://community.canvaslms.com/t5/Canvas-Basics-Guide/What-are-Rubrics/ta-p/35
- Finally, write 3-4 variations on the deliverable product that still require the student to demonstrate the specified behavior, but end up producing slightly different output products. (same outcome, same rubric, different activities).
- Do not provide unlimited attempts for final mastery assessment. You may permit provisional pass to permit progression with the expectation that mastery will be met by the end of the course.
References
- https://knilt.arcc.albany.edu/Effective_Use_of_Self-paced_Learning_in_the_Classroom_Environment
- https://www.redesignu.org/design-lab/mastery-learning/resource-bank/self-paced-learning
- https://www.cultofpedagogy.com/self-paced-learning/
- https://www.wiley.com/network/instructors-students/teaching-strategies/designing-a-self-paced-learning-program-a-primer
- https://www.edutopia.org/article/getting-started-self-paced-learning
- https://files.eric.ed.gov/fulltext/EJ800986.pdf